Introduction
Android Componets
UserInterface
Advanced UI
Data Storage
Advanced Concepts
Others
New Studio
Introduction - 1.1 Techo. Introduction
- 1.2 Android - Introduction
- 1.3 Architecture
- 1.4 Application Components
- 1.5 Hello World Example
- 1.6 Project Structure
- 1.7 Android Tools
- 1.8 App Workflow
- 1.9 Multiple Screens Support
- 1.10 Organizing Project
- 1.11 App Debugging
- 1.12 Interview Questions
- 1.13 Creating Emulator and Mobile
- 1.14 Road Map
Organizing Your Android Development Code Structure
Java Code
Writing a medium to large Android app requires having code structure.1. com.example.activities
- Contains all the activities. Classes are all named with Activity at the end. That way, you can immediately know what it is when reading Java code.
2. com.example.adapters
- Contains all the adapters.
3. com.example.data
- Contains all classes related to data management such as ContentProvider and SQLiteHelper.
4. com.example.fragments
- Contains all fragments.
5. com.example.helpers
Contains helper classes. A helper class is a place to put code that is used in more than one place. I have a DateHelper for instance. Most of the methods are static.
6. com.example.interfaces
Contains all interfaces.
7. com.example.utils
Contains all date,constants,etc..,
8. com.example.custom_widgets
This is borrowed from the Android convention. You put custom widgets controls in here.
9. com.example.models
Contains all local models. When syncing from an HTTP API I parse the JSON into these Java objects using Jackson. I also pull Cursor rows into these models as well.
Layouts
The layouts folder can easily become disorganized since you can't have any folders in it.We name our layout files with a prefix depending on what they are for. This sorts them together in the Eclipse file listing.
R.layout
- activity_
- adapter_
- fragment_
Naming convention
1. Naming convention for Xml files
activity_<ACTIVITY NAME>.xml - for all activities
dialog_<DIALOG NAME>.xml - for all custom dialogs
row_<LIST_NAME>.xml - for custom row for listview
fragment_<FRAGMENT_NAME>.xml - for all fragments
2. Naming convention for component/widget in xml files.
all component for x activity must be start with activity name
all component should have prefix or short name like btn for button
For example,name for login activity component should be like following.

activity_login_btn_login
activity_login_et_username
activity_login_et_password
Short name of major components

Button - btn
EditText - et
TextView - tv
Checkbox - chk
RadioButton - rb
ToggleButton - tb
Spinner - spn
Menu - mnu
ListView - lv
GalleryView - gv
LinearLayout -ll
RelativeLayout - rl
In an Android Project manage code like this:
1. In Activity first create an initializeViews() method and put all objects in this method;
for example:
private void initializeViews(){
 edittext= (EditText) findViewById(R.id.Example);
 // etc.....
}
initializeViews() is called in the onCreate() method.2. If some method and menu is implemented in all acivities then create one
Baseactivity and have your other activities extend this class:
public class BaseActivity extends Activity {
  // Implent Menu

  @Override
  public boolean onCreateOptionsMenu(Menu menu) {

  }

  @Override
  public boolean onOptionsItemSelected(MenuItem item) {
  }
after that for example I have one activity name like A
public class A extends BaseActivity {
  // now you access menu in this activity
}
Android Coding Style Conventions
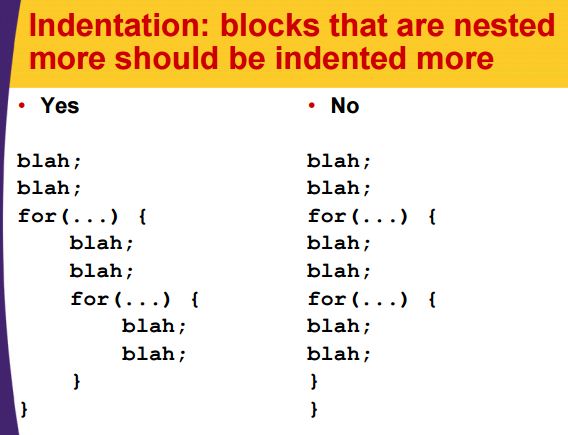
Indentation: blocks that are nested more should be indented more
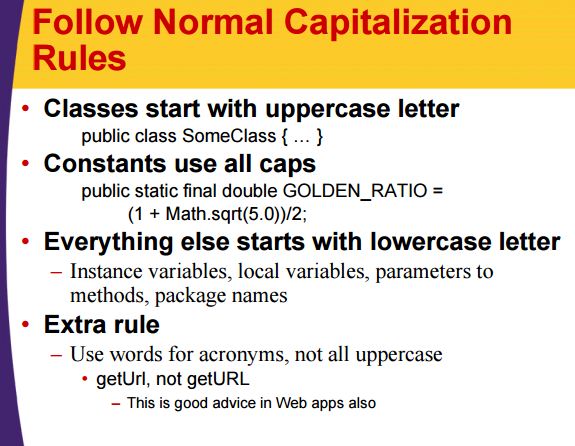
Follow Normal Capitalization Rules
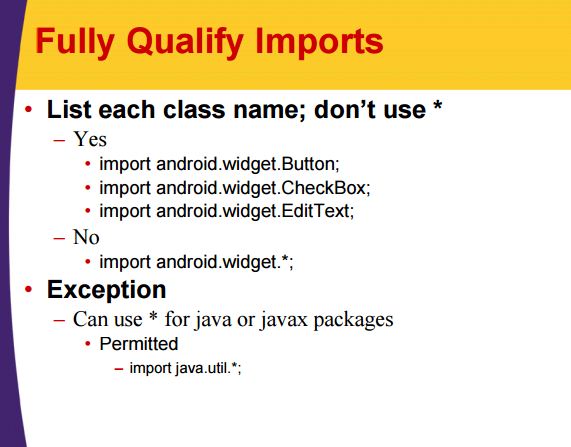
Fully Qualify Imports
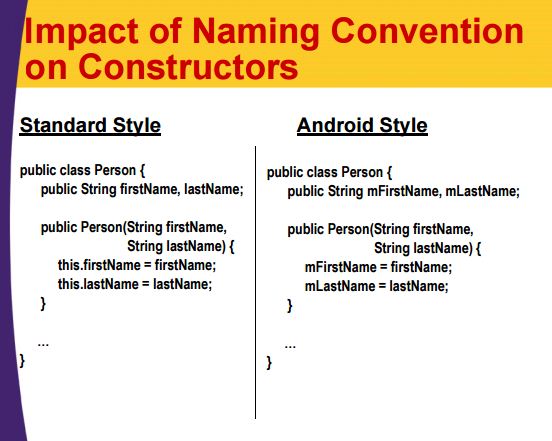
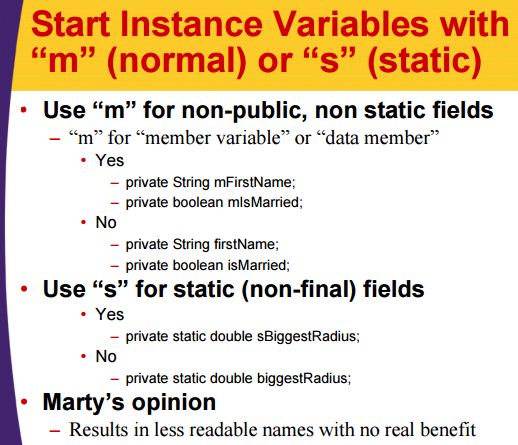
Start Instance Variables with "m" (normal) or "s" (static)
Impact of Naming Convention on Constructors