Introduction
Android Componets
UserInterface
Advanced UI
Data Storage
Advanced Concepts
Others
New Studio
Working with Action Bar
Android action bar was introduced to maintain a consistent navigation across the application.It has the powerful capabilities like
- adapting to screen configurations (landscape & portrait),
- adding widgets to action bar (search, sharing etc.),
- providing navigation between screens (drop-down & tabbed navigation) and much more.
Overview of Action Bar
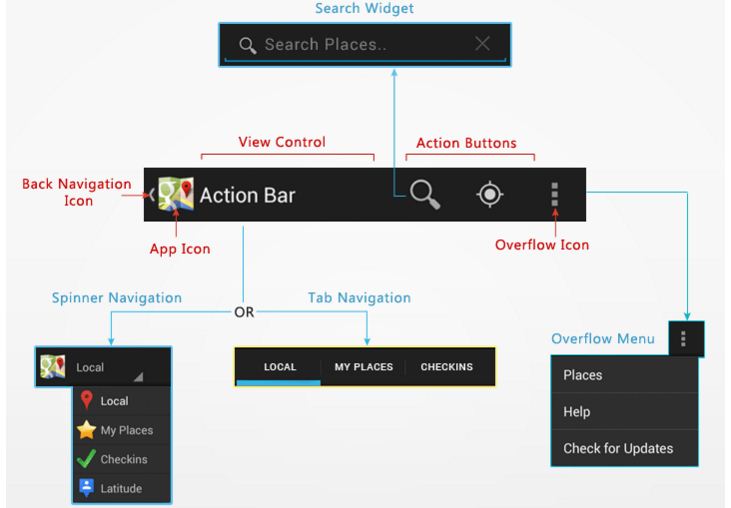
Action bar mainly contains four functional areas. They are app icon, view control, action buttons and action overflow.- App Icon - App branding logo or icon will be displayed here.
- View Control - A dedicated space to display app title. Also provides option to switch between views by adding spinner or tabbed navigation.
- Action Buttons - Some important actions of the app can be added here.
- Action Overflow - All unimportant action will be shown as a menu.
Action bar is introduced in android 3.0 (API level 11), but if you want your app to support action bar in older versions too, then use Support Library to make it compatible with older versions (Android 2.1 and above).
Android.com provides some useful icons for action bar. Download the Action Bar Icon Set and select the required icons and add them to the project. Copy each icon with all resolutions (xxhdpi, xhdpi, hdpi, mdpi) into respected folders in Eclipse project under res => drawable- folders.
Step - 1
Create a new xml file under res => menu named activity_main_actions.xml and add the following code. Here each <item> indicates each action item.
activity_main_actions.xml
<?xml version="1.0" encoding="utf-8"?>
<menu xmlns:android="http://schemas.android.com/apk/res/android" >
    <!-- Search / will display always -->
    <item android:id="@+id/action_search"
          android:icon="@drawable/ic_action_search"
          android:title="@string/action_search"
          android:showAsAction="ifRoom"/>

    <!-- Location Found -->
    <item android:id="@+id/action_location_found"
          android:icon="@drawable/ic_action_location_found"
          android:title="@string/action_location_found"
          android:showAsAction="ifRoom" />

    <!-- Refresh -->
    <item android:id="@+id/action_refresh"
          android:icon="@drawable/ic_action_refresh"
          android:title="@string/action_refresh"
          android:showAsAction="ifRoom" />

    <!-- Help -->
    <item android:id="@+id/action_help"
          android:icon="@drawable/ic_action_help"
          android:title="@string/action_help"
          android:showAsAction="never"/>

    <!-- Check updates -->
    <item android:id="@+id/action_check_updates"
          android:icon="@drawable/ic_action_refresh"
          android:title="@string/action_check_updates"
          android:showAsAction="never" />
</menu>
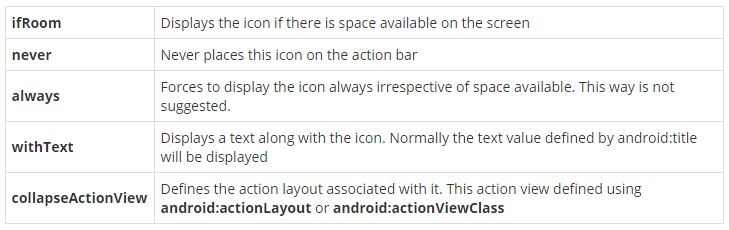
Here the important xml attributes should be known are :android:icon- Defines the icon of the action item.android:title- Title for the icon.android:showAsAction- Defines the visibility of the action item. It accepts following values.
Add onCreateOptionsMenu() method in main activity class.
MainActivity.java
public class MainActivity extends Activity{

    @Override
    protected void onCreate(Bundle savedInstanceState) {
        super.onCreate(savedInstanceState);
        setContentView(R.layout.activity_main);
    }

    @Override
    public boolean onCreateOptionsMenu(Menu menu) {
        MenuInflater inflater = getMenuInflater();
        inflater.inflate(R.menu.activity_main_actions, menu);

        return super.onCreateOptionsMenu(menu);
    }
}
RESULT :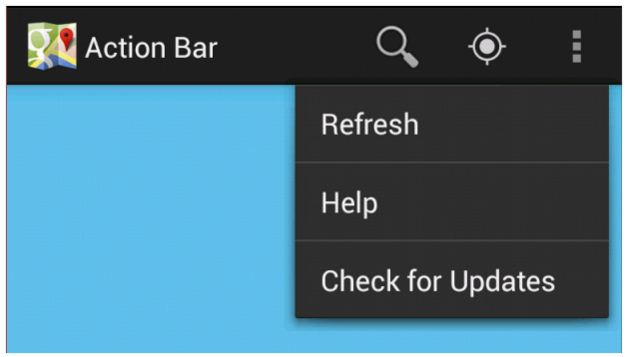
Step - 3 : Handling Action Bar Icon Click Events
Open your main activity and override onOptionsItemSelected() method. This method accepts menu item as a parameter. Selected action item can be identified by using it's id.
MainActivity.java
public class MainActivity extends Activity{
...
...

    /**
     * On selecting action bar icons
     * */
    @Override
    public boolean onOptionsItemSelected(MenuItem item) {
        // Take appropriate action for each action item click
        switch (item.getItemId()) {
        case R.id.action_search:
            // search action
            return true;
        case R.id.action_location_found:
            // location found
            LocationFound();
            return true;
        case R.id.action_refresh:
            // refresh
            return true;
        case R.id.action_help:
            // help action
            return true;
        case R.id.action_check_updates:
            // check for updates action
            return true;
        default:
            return super.onOptionsItemSelected(item);
        }
    }

    /**
     * Launching new activity
     * */
    private void LocationFound() {
        Intent i = new Intent(MainActivity.this, LocationFound.class);
        startActivity(i);
    }
}
Step - 4 : Enabling Up / Back NavigationAction bar also provides the feasibility of back navigation when the app involves hierarchical relationship between screens. To test this scenario I have created another activity and enabled the up navigation in that activity. If you observe the above section, I have launched LocationFound activity in the menu selection block.
activity_location_found.xml
<?xml version="1.0" encoding="utf-8"?>
<LinearLayout xmlns:android="http://schemas.android.com/apk/res/android"
    android:layout_width="match_parent"
    android:layout_height="match_parent"
    android:orientation="vertical"
    android:padding="10dp">

    <TextView android:layout_width="fill_parent"
        android:layout_height="wrap_content"
        android:text="Location is found. Drop a Message here"/>

</LinearLayout>
Action bar Up navigation can be enabled by calling setDisplayHomeAsUpEnabled(true) method on to action bar. By calling this function a back arrow will be displayed on the action bar.LocationFound.java
import android.app.ActionBar;
import android.app.Activity;
import android.os.Bundle;

public class LocationFound  extends Activity {

    @Override
    protected void onCreate(Bundle savedInstanceState) {
        super.onCreate(savedInstanceState);
        setContentView(R.layout.activity_location_found);

        // get action bar
        ActionBar actionBar = getActionBar();

        // Enabling Up / Back navigation
        actionBar.setDisplayHomeAsUpEnabled(true);
    }
}
Also we need to add the new activity in AndroidManifest.xml file. Here we have to mention the parent activity to which the up navigation is pointing to by using android:parentActivityName property.
<!-- Location found activity -->
        <activity
            android:name="info.androidhive.actionbar.LocationFound"
            android:label="@string/activity_new_message"
            android:parentActivityName="info.androidhive.actionbar.MainActivity" >
        </activity>
RESULT : 
Step - 5 : Hiding / Showing the Action Bar in Particular Activity
In some cases you might wanted to hide the action bar in particular activity. You can hide and show the action bar by calling hide() and show() methods.
ActionBar actionBar = getActionBar();
// hide the action bar
actionBar.hide();

// show the action bar
actionBar.show();
Step - 6 : Changing the Action Bar IconAction bar by default displays the application icon which was set using
android:icon in the AndroidManifest.xml file. So if you want to change the action bar icon, you can do it by calling setIcon(drawable) on to action bar.
ActionBar actionBar = getActionBar();

// set the icon
actionBar.setIcon(R.drawable.ico_actionbar);
RESULT : 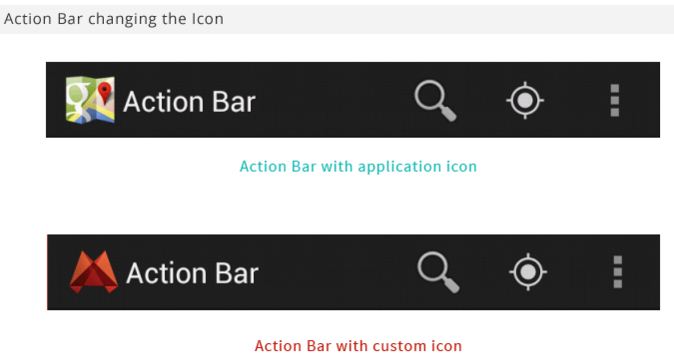
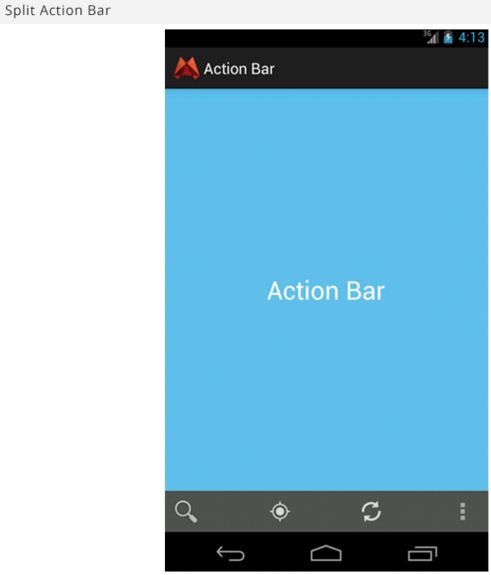
Step - 7 : Enabling Split Action Bars
Split action bar provides a separate bar at the bottom of the screen. This option will be useful when you want to display the action items at the bottom of the screen by leaving some space on the title bar.
To enable split action bar add
uiOptions="splitActionBarWhenNarrow" to all the <activity> tags or to the <application> tag directly in AndroidManifest.xml file. Also we need to add <meta-data> with the value android.support.UI_OPTIONS to support older version below API level 14.
<!-- Location found activity -->
<activity
    android:name="info.androidhive.actionbar.LocationFound"
    android:label="@string/activity_location_found"
    android:parentActivityName="info.androidhive.actionbar.MainActivity" >
    <!-- To support below API Level 14 -->
    <meta-data android:name="android.support.UI_OPTIONS"
           android:value="splitActionBarWhenNarrow" />
</activity>
RESULT :