Introduction
Android Componets
UserInterface
Advanced UI
Data Storage
Advanced Concepts
Others
New Studio
- Android User Interface
- 3.1 Introduction(Nano)
- 3.2 Layouts(Nano)
- -- LinearLayout(Nano)
- -- RelativeLayout(Nano)
- -- TableLayout(Mega)
- -- Frame Layout(Mega)
- --
Absolute Layout - -- Grid Layout(Mega)
- 3.3 UI Widgets (Nano)
- -- TextView(Nano)
- -- EditText(Nano)
- -- Button(Nano)
- -- Event Handler(Nano)
- -- Image Buttons(Nano)
- -- CheckBox(Nano)
- -- Dialog(Nano)
- -- RadioGroup & RadioButtons(Nano)
- -- Toast(Nano)
- -- RatingBar(Nano)
- -- SeekBar(Nano)
- -- ProgerssBar(Nano)
- -- ToggleButton(Nano)
- -- WebView(Nano)
- -- Spinner(Nano)
- -- Layout Inflator(Mega)
- -- ListView and Adapters(Mega)
- -- Gridview(Mega)
- 3.4 Android Resources(Nano)
- -- Resource Introduction(Nano)
- -- Animation Resources(Mega)
- -- Color State List Resource(Mega)
- -- Drawable Resources(Mega)
- -- Layout Resource(Nano)
- -- String Resources(Nano)
- -- Style Resource(Mega)
- -- Supporting Multiple Screens(Mega)
- -- Practises
Android Linear Layout
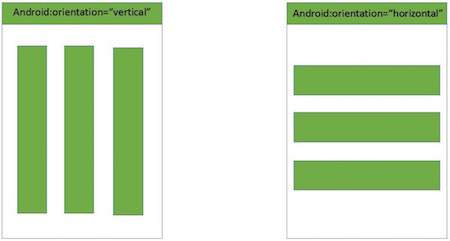
Android LinearLayout is a view group that aligns all children in either vertically or horizontally.(via orientation attribute. )
Note : In additional, the highest weight component will fill up the remaining space in LinearLayout.
LinearLayout Attributes
Following are the important attributes specific to LinearLayout :| Attribute | Description |
|---|---|
| android:id | This is the ID which uniquely identifies the layout. |
| android:orientation | This specifies the direction of arrangement and you will use horizontal for a row, vertical for a column. The default is horizontal. |
Ex 1: Linear Layout orientation : horizontal
<?xml version="1.0" encoding="utf-8"?>
<LinearLayout xmlns:android="http://schemas.android.com/apk/res/android"
    android:layout_width="match_parent"
    android:layout_height="match_parent"
    android:orientation="horizontal" >

    <Button
        android:id="@+id/button1"
        android:layout_width="wrap_content"
        android:layout_height="wrap_content"
        android:text="Button -1" />

    <Button
        android:id="@+id/button2"
        android:layout_width="wrap_content"
        android:layout_height="wrap_content"
        android:text="Button -2" />

    <Button
        android:id="@+id/button3"
        android:layout_width="wrap_content"
        android:layout_height="wrap_content"
        android:text="Button -3" />

</LinearLayout>
Result of above code.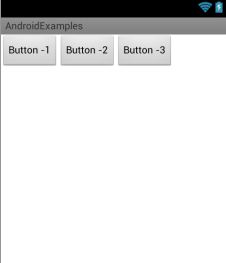
Ex 2: Linear Layout orientation : vertical
<?xml version="1.0" encoding="utf-8"?>
<LinearLayout xmlns:android="http://schemas.android.com/apk/res/android"
    android:layout_width="match_parent"
    android:layout_height="match_parent"
    android:orientation="vertical" >

    <Button
        android:id="@+id/button1"
        android:layout_width="wrap_content"
        android:layout_height="wrap_content"
        android:text="Button -1" />

    <Button
        android:id="@+id/button2"
        android:layout_width="wrap_content"
        android:layout_height="wrap_content"
        android:text="Button -2" />

    <Button
        android:id="@+id/button3"
        android:layout_width="wrap_content"
        android:layout_height="wrap_content"
        android:text="Button -3" />

</LinearLayout>
Result of above code.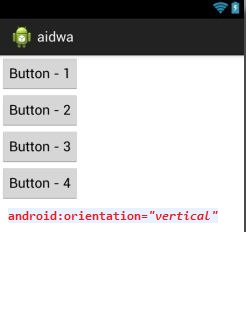
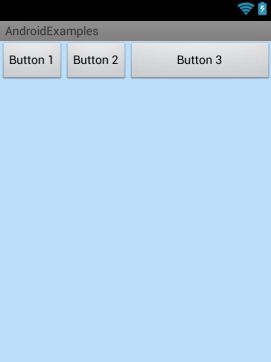
Ex 3: Applying weight for child views
a) Add 3 buttons within LinearLayout, withhorizontal orientation. In this case, the highest weight is button3, so it will fill up the remaining space in the layout.
<?xml version="1.0" encoding="utf-8"?>
<LinearLayout xmlns:android="http://schemas.android.com/apk/res/android"
    android:layout_width="fill_parent"
    android:layout_height="fill_parent"
    android:orientation="horizontal" >

    <Button
        android:id="@+id/button1"
        android:layout_width="wrap_content"
        android:layout_height="wrap_content"
        android:text="Button 1" />

    <Button
        android:id="@+id/button2"
        android:layout_width="wrap_content"
        android:layout_height="wrap_content"
        android:text="Button 2" />

    <Button
        android:id="@+id/button3"
        android:layout_width="wrap_content"
        android:layout_height="wrap_content"
        android:text="Button 3"
        android:layout_weight="1"/>

</LinearLayout>
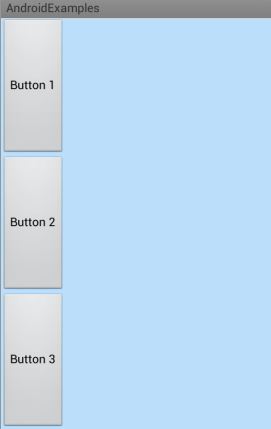
b) In above example, make orientation with vertical.
<?xml version="1.0" encoding="utf-8"?>
<LinearLayout xmlns:android="http://schemas.android.com/apk/res/android"
    android:layout_width="fill_parent"
    android:layout_height="fill_parent"
    android:background="#BBDEFB"
    android:orientation="vertical" >

    <Button
        android:id="@+id/button1"
        android:layout_width="wrap_content"
        android:layout_height="wrap_content"
        android:text="Button 1" />

    <Button
        android:id="@+id/button2"
        android:layout_width="wrap_content"
        android:layout_height="wrap_content"
        android:text="Button 2" />

    <Button
        android:id="@+id/button3"
        android:layout_width="wrap_content"
        android:layout_height="wrap_content"
        android:text="Button 3"
        android:layout_weight="1">

</LinearLayout>

c) In above example, filling up the space uniformly in the layout.
<?xml version="1.0" encoding="utf-8"?>
<LinearLayout xmlns:android="http://schemas.android.com/apk/res/android"
    android:layout_width="fill_parent"
    android:layout_height="fill_parent"
    android:background="#BBDEFB"
    android:orientation="vertical" >

    <Button
        android:id="@+id/button1"
        android:layout_width="wrap_content"
        android:layout_height="wrap_content"
        android:layout_weight="1"
        android:text="Button 1" />

    <Button
        android:id="@+id/button2"
        android:layout_weight="1"
        android:layout_width="wrap_content"
        android:layout_height="wrap_content"
        android:text="Button 2" />

    <Button
        android:id="@+id/button3"
        android:layout_width="wrap_content"
        android:layout_height="wrap_content"
        android:text="Button 3"
        android:layout_weight="1"/>

</LinearLayout>
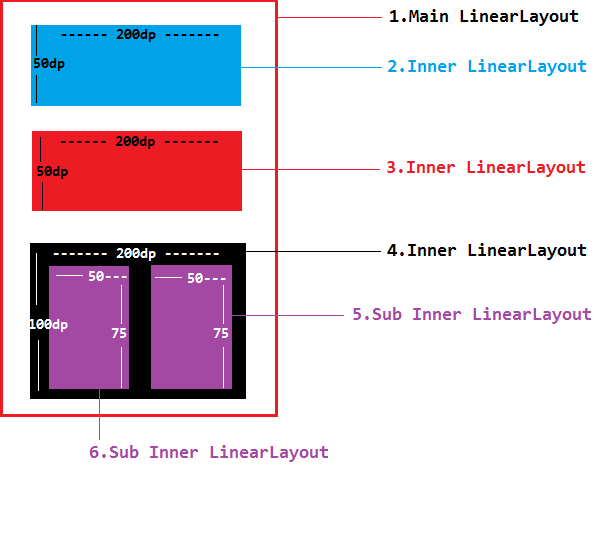
Ex 4: Nested LinearLayout
<?xml version="1.0" encoding="utf-8"?>
<LinearLayout xmlns:android="http://schemas.android.com/apk/res/android"
    android:layout_width="match_parent"
    android:layout_height="match_parent"
    android:orientation="vertical" >

    <LinearLayout
        android:layout_width="200dp"
        android:layout_height="50dp"
        android:layout_marginLeft="45dp"
        android:layout_marginTop="25dp"
        android:background="#0000FF" >
    </LinearLayout>

    <LinearLayout
        android:layout_width="200dp"
        android:layout_height="50dp"
        android:layout_marginLeft="45dp"
        android:layout_marginTop="25dp"
        android:background="#FF0000" >
    </LinearLayout>

    <LinearLayout
        android:layout_width="200dp"
        android:layout_height="100dp"
        android:layout_marginLeft="45dp"
        android:layout_marginTop="25dp"
        android:background="#000000"
        android:orientation="horizontal" >

        <LinearLayout
            android:layout_width="75dp"
            android:layout_height="50dp"
            android:layout_marginLeft="15dp"
            android:layout_marginTop="25dp"
            android:background="#9C27B0" >
        </LinearLayout>

        <LinearLayout
            android:layout_width="75dp"
            android:layout_height="50dp"
            android:layout_marginLeft="15dp"
            android:layout_marginTop="25dp"
            android:background="#9C27B0" >
        </LinearLayout>
    </LinearLayout>

</LinearLayout>
Ex 4: gravity, layout_gravity, padding, margins

layout_gravity
The layout_gravity attributeYou'll use the layout_gravity attribute in a child view to position itself along the x, y axis inside one of the View group containers, such as:
- LinearLayout
- GridLayout
- FrameLayout
Here are some of the common constant values that you can use to set the layout_gravity attribute:
top
- positions the object at the top of the containerbottom
- positions the object at the bottom of the containerleft
- positions the object on the left of the containerright
- positions the object on the right of the containercenter_vertical
- positions the object in the vertical center of the containercenter_horizontal
- positions the object in the horizontal center of the containercenter
- positions the object in both the vertical and horizontal center of the container
android:layout_gravity="left|top"
<?xml version="1.0" encoding="utf-8"?>
<LinearLayout xmlns:android="http://schemas.android.com/apk/res/android"
    android:layout_width="fill_parent"
    android:layout_height="fill_parent"
    android:background="#BBDEFB"
    android:orientation="vertical" >

    <TextView
        android:layout_width="wrap_content"
        android:layout_height="wrap_content"
        android:layout_gravity="top|center_horizontal"
        android:text="Registration"
        android:textSize="24sp"
        android:textStyle="bold" />

</LinearLayout>